Microsoft Lab 4 – Active Directory Domain Services
Active Directory Domain Services
In Lab 4 - Active Directory Domain Services (AD DS), participants typically focus on advanced configurations and management tasks related to Active Directory within a Windows Server 2016 environment. This lab involves in-depth exploration of AD DS features, including fine-grained password policies, organizational units (OUs), trusts, and replication settings. Participants may also delve into Group Policy management for centralized control over user and computer configurations. The lab aims to provide hands-on experience in implementing and managing sophisticated AD DS functionalities, allowing participants to enhance the scalability, security, and efficiency of their Active Directory infrastructure. Successful completion of Microsoft Lab 4 equips participants with advanced skills in administering and optimizing Active Directory Domain Services for robust and scalable enterprise environments.
Lab:
Adding Active Directory Domain Services Roles
1. First we click on Add roles and features.

2. The first page of the Add Roles and Features Wizard describes what this wizard does and recommends a few prerequisite tasks. Just click Next here to continue.

3. The Installation Type page gives us two options although we’re only concerned with one. Leave the radio button on the Role-based or feature-based installation option and click Next.

4. The Server Selection page is where we can select one or more servers to install roles and features to. The default setting is the local server and so we’ll leave it as is and click Next.

5. The Server Roles page has a ton of possible roles to install. The Active Directory Domain Services and DNS Server roles need to both be checked.

6. When you check the Active Directory Domain Services role it will pop open another dialog that notifies you of additional features that will automatically be installed along with the AD DS roles. These features are needed to manage the AD DS role through PowerShell, the GUI and the command line. When you click the Add Features button the AD DS Role will show as checked.

7. When you check the DNS Server role it will pop open another dialog that notifies you of additional features that will automatically be installed along with the DNS Server roles. This feature is the DNS Server command line and GUI tool. When you click the Add Features button the DNS Server Role will show as checked.


8. With both roles selected we can now click Next

9. On the Features page nothing else needs to be added so we can click Next

10. The DNS Server page describes the DNS Server role. Click Next to Continue

11. The AD DS page describes the role you’re installing and tells you that you need to install DNS Server. Click Next to continue here as well

12. The Confirmation page displays the roles and features we previously selected and allows us to verify our choices

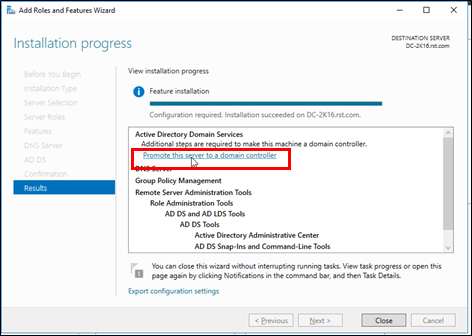
13. After clicking Install the installation process for the roles and features selected will begin

14. When the process completes we’re presented with a link to Promote this server to a domain controller. Clicking the link opens up the Active Directory Domain Services Configuration Wizard.
Adding the new Active Directory Domain/Forest
- On the Active Directory Domain Services Configuration Wizard we get the first actual steps to building the new domain controller.
Presented with several options we want to select Add a new forest.
On Root domain name we’ll enter the name for the new domain.

2. On the Domain Controller Options page
- We can choose the Forest functional level and Domain functional level.
- The Specify domain controller capabilities check boxes have 3 options that are all grayed out.
- The DNS and Global Catalog options are automatically selected for us since this is our first domain controller.
- We also must enter a Directory Services Restore Mode (DSRM) password here. DSRM is essentially safe mode for a domain controller which allows an administrator to
- Repair or restore an Active Directory database.

3. Moving to the DNS Options sub-page we see a warning indicating that the wizard can’t create a delegation for you. This error is being and can be ignored. It’s trying to contact a DNS server that is authoritative for the domain that doesn’t exist yet. Click Next here.

4. The Additional Options page asks for the NetBIOS domain name. we don’t want to create a disjoint namespace or anything else for this domain controller so we are going to make it RST which is the primary DNS suffix match for RST.com. Click Next again here

5. Paths for the Active Directory Database, Logs and SYSVOL. Leave it by default and Click Next again

6. This one should be pretty self-explanatory. Make sure you picked all the right options and click Next

7. The Prerequisites Check makes sure your server is ready to go and a green check at the top signifies we’re clear to click Install

8. Clicking Install starts the promotion of this server to an Active Directory Domain Controller and usually takes a few minutes

9. When the wizard has completed you’ll see a green check notification in the dialog that states the server was successfully configured as a domain controller. You will also be notified that you’re being logged out because the server is going to restart.
Windows will restart and start applying all the setting changes necessary to make this server an Active Directory Domain Controller.

10. When it finishes rebooting the installation is complete and you can login using domain credentials
