Cisco DevNet - Lab 5: Netconf Configuring Devices
Netconf Configuring Devices
In Lab 5, participants delve into the practical aspects of network programmability by configuring devices using Netconf. This hands-on lab focuses on leveraging the Netconf protocol to dynamically and programmatically modify configurations on Cisco network devices. Participants typically utilize Python scripts or other automation tools to interact with Netconf-enabled devices and push specific configurations. This experience allows participants to gain proficiency in crafting Netconf payloads and understanding how to apply changes to device configurations programmatically. By actively configuring devices using Netconf, participants enhance their skills in automating network changes, reinforcing the principles of network programmability within the Cisco DevNet framework. This lab is instrumental in bridging theoretical knowledge with practical implementation, fostering a deeper understanding of Netconf in the context of Cisco's programmable infrastructure.
Lab:
This lab exercise will get you started with NETCONF connections, sending configurations, and retrieving data.
You will learn to access the YANG modeled configuration and operational data on your network devices.
LAB Objectives
The objective of this lab is to Learn:
- NETCONF Protocol Stack
- Relationship between NETCONF and YANG
- Use of ncclient to make NETCONF requests with Python
- Develop and operations with NETCONF
Breaking down NETCONF Communications
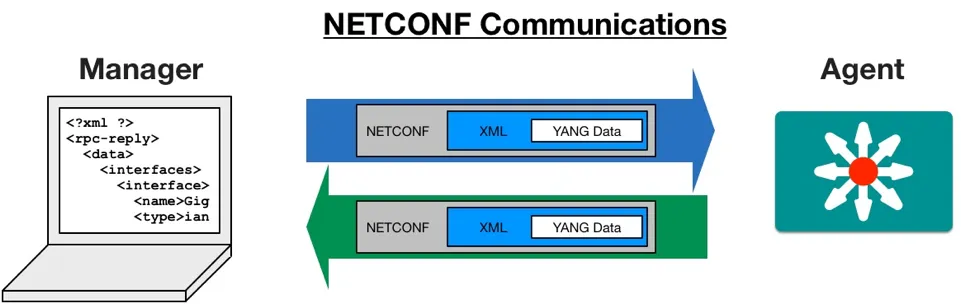
NETCONF (from “NETwork CONFiguration”) is the primary transport protocol used with YANG data models today. It defines how a manager (client) and agent (server) communicate in a standard fashion.
Step 1: Hello with SSH and NETCONF
- Open a basic NETCONF session with router using the ssh. Type following command on Terminal
ssh cisco@10.0.0.1 -p 830 -s netconf
- The router will reply with “hello” and vast content presenting its “capabilities”.
<hello xmlns="urn:ietf:params:xml:ns:netconf:base:1.0">
	<capabilities>
		<capability>urn:ietf:params:netconf:base:1.1</capability>
		<capability>urn:ietf:params:netconf:capability:candidate:1.0</capability>
		<capability>urn:ietf:params:xml:ns:yang:ietf-netconf-monitoring</capability>
		<capability>urn:ietf:params:xml:ns:yang:ietf-interfaces</capability>
		[output omitted and edited for clarity]
	</capabilities>
	<session-id>22540</session-id></hello>]]>]]>
- We need to reply with a hello and the capabilities that our manager supports. Copy paste the text below on the terminal window. You will not see any response, but you have now created an active NETCONF connection to the device.
<?xml version="1.0" encoding="UTF-8"?>
	<hello xmlns="urn:ietf:params:xml:ns:netconf:base:1.0">
	<capabilities>
		<capability>urn:ietf:params:netconf:base:1.0</capability>
	</capabilities>
		</hello>]]>]]>
- To end the session, send a message to close operation. Paste the text below on Terminal
<?xml version="1.0" encoding="UTF-8"?>
	<rpc message-id="559" xmlns="urn:ietf:params:xml:ns:netconf:base:1.0">
	<close-session />
	</rpc>
	]]>]]>
NETCONF Capabilities
NETCONF is a transport protocol and NETCONF uses YANG (and non-YANG) data models to list down “capabilities” a device provides. In the “hello” phase, capabilities are exchanged between a manager(Client) and agent(Server)
RPC
NETCONF uses Remote Procedure Calls (RPCs), to send a request to a server and perform an action. XML-formatted message are sent to the server. Server returns results within an <rpc-reply>. The <rpc> message sends a message-id attribute with a unique value to identify the request it is responding to:
<rpc-reply message-id="urn:uuid:4ca456ec-ce2a-559c-cb68-1c70dd2227a5">
.
.
</rpc-reply>
ncclient and other similar NETCONF clients handle these types of RPC elements for you.
Step 1: NETCONF to get Interface Details
- Open a basic NETCONF session to a IOS-XE router using the ssh command line utility lab. On you Unix Terminal enter the following command.
ssh cisco@10.0.0.1 -p 830 -s netconf
- The router will reply with “hello” and its “capabilities” list. We need to reply with a hello and capabilities that our manager supports.
Copy paste the text below. There will be no response to the below reply, but you have now created an active NETCONF connection to the device.
<?xml version="1.0" encoding="UTF-8"?>
	<hello xmlns="urn:ietf:params:xml:ns:netconf:base:1.0">
	<capabilities>
		<capability>urn:ietf:params:netconf:base:1.0</capability>
	</capabilities>
		</hello>]]>]]>
- To get interface details, copy paste the text below on the terminal window.
<?xml version="1.0"?>
<rpc xmlns="urn:ietf:params:xml:ns:netconf:base:1.0"xmlns:cpi="http://www.cisco.com/cpi_10/schema"
message-id="101">
		<get-config>
				<source>
							<running/>
					</source>
				<filter>
					<interfaces xmlns="urn:ietf:params:xml:ns:yang:ietf-interfaces">
					<interface>
					<name/>
					<description/>
					<ipv4 xmlns="urn:ietf:params:xml:ns:yang:ietf-ip">
						<address/>
					</ipv4>
					<enabled/>
					</interface>
					</interfaces>
		</filter>
		</get-config>
</rpc>
- Following is output of all interfaces and its details will be seen in a raw format.
<?xml version="1.0" encoding="UTF-8"?>

<rpc-reply xmlns="urn:ietf:params:xml:ns:netconf:base:1.0" message-id="101"
xmlns:cpi="http://www.cisco.com/cpi_10/schema"><data><interfaces
xmlns="urn:ietf:params:xml:ns:yang:ietf-interfaces"><interface><name>GigabitEthe
rnet1</name><description>MANAGEMENT INTERFACE - DON'T TOUCH ME</
description><enabled>true</enabled><ipv4
xmlns="urn:ietf:params:xml:ns:yang:ietf-ip"><address><ip>10.0.0.1</
ip><netmask>255.255.255.0</netmask></address></ipv4></
interface><interface><name>GigabitEthernet2</name><description>RSTForum NETCONF
Script</description><enabled>true</enabled><ipv4
xmlns="urn:ietf:params:xml:ns:yang:ietf-ip"><address><ip>10.255.255.1</
ip><netmask>255.255.255.0</netmask></address><address><ip>200.0.0.200</
ip><netmask>255.0.0.0</netmask></address></ipv4></
interface><interface><name>GigabitEthernet3</name><enabled>false</enabled></
interface><interface><name>GigabitEthernet4</name><enabled>true</enabled></
interface></interfaces></data></rpc-reply>]]>]]>
Data Stores

NETCONF has “Data Stores” (Something like MIBs in SNMP) to provide targets of individual operation events. Each container has a copy of the configuration data that can be pre-validated before committing to active configuration.
The below example is using the “running” data store in this code line to get running configuration and using a filter to filter out hostname:
result = m.get_config('running', hostname_filter)
Another benefit of data stores is that before committing a set of changes to a number of network devices, a network management system can look at the configurations for those devices in its data store to verify that they are consistent.
Key Points
- A container may hold an entire or partial configuration.
- Not all data stores are supported on all devices.
- “running” is the only mandatory data store.
- Not all data stores are writeable.
- A “URL” data store is supported by IOS to enable
<config-copy> - Every NETCONF message must target a data store.
Understanding NETCONF Operations
A NETCONF RPC request uses one of the following XML elements to specify the action it is requesting:
| Operation       | Description                                                                                                                 |
|-----------------|-----------------------------------------------------------------------------------------------------------------------------|
| `<get>`           | Retrieve running configuration and device state information.                                                                |
| `<get-config>`    | Retrieve all or part of a specified configuration datastore.                                                                |
| `<edit-config>`   | The <edit-config> operation loads all or part of a specified configuration to the specified target configuration datastore. |
| `<copy-config>`   | Create or replace an entire configuration datastore with the contents of another complete configuration datastore.          |
| `<delete-config>` | Delete a configuration datastore. The <running> configuration datastore cannot be deleted.                                  |
| `<commit>`        | The <commit> operation instructs the device to implement the configuration data contained in the candidate configuration.   |
| `<lock>`          | The <lock> operation allows the client to lock the entire configuration datastore                                           |
| `<unlock>`        | The <unlock> operation is used to release a configuration lock, previously obtained with the <lock> operation.              |
| `<close-session>` | Request graceful termination of a NETCONF session.                                                                          |
| `<kill-session>`  | Force the termination of a NETCONF session.                                                                                 |
Step 3: Python script to get Capability list
- Open a terminal, navigate to the root of the netconf repository. Navigate to the directory netconf
cd rstforum/knowledgebase/netconf
- This directory contains several sample scripts. Run below cmd to read
get-capability.pyscript
cat get-capability.py
- Expected output is as below
from ncclient import manager
m = manager.connect(host="10.0.0.1", port=830, username="cisco", password="cisco")

for RSTForum in m.server_capabilities:
	print(RSTForum)
- Following line from the above script, Imports in the “Manager” object from “ncclient”
library
from ncclient import manager
- Open a connection to router using the manager object.
m = manager.connect(host="10.0.0.1", port=830, username="cisco", password="cisco")
- Review the capabilities of the device by looping over the server capabilities property of the manager object.
for RSTForum in m.server_capabilities:
		print(RSTForum)
- Execute from the terminal.
$ python get-capability.py
-
Following output will be seen. Every line list one capability. Each line includes several pieces of data including the Model URI, Model Name, Model Version, and other details.
-
Below are the two capabilities that we have extracted and formatted the output for simplicity
NOT TO BE PASTED ON TERMINAL
urn:ietf:params:xml:ns:yang:ietf-interfaces? module=ietf-interfaces & revision=2017-06-09 & features=pre-provisioning,if-mib,arbitrary-names & deviations=ietf-ip-devs
.
http://cisco.com/ns/ietf-ip/devs? module=ietf-ip-devs & revision=2018-06-10
Step 4: Automating Your Network – NETCONF
- Let’s use some Python scripts examples that show how NETCONF can be used to configure devices.
cd rstforum/knowledgebase/netconf
Retrieving Current Configuration Details
-
Use text editor to open “get _int_details.py “ script and observe.
-
We are importing “xmltodict” and minidom. These libraries make working with the XML data easier.
from ncclient import manager
import xmltodict
import xml.dom.minidom
- In this script the goal is to retrieve the interfaces using the ietf-interfaces model. We are using filter in the request, or else NETCONF will return everything available across all data models. Using such filters make data handling easier
RSTForum_filter = ‘’’
	<filter>
	<native xmlns="http://cisco.com/ns/yang/Cisco-IOS-XE-native">
		<interface>
		<GigabitEthernet>
			<name>2</name>
		</GigabitEthernet>
		</interface>
	</native>
	</filter>
'''

m = manager.connect(host="10.0.0.1", port=830, username="cisco", password="cisco")
- In the active connection we are using NETCONF
<get-config>operation with the filter.
result = m.get_config('running', RSTForum_filter)
- In this line we print out the raw XML data in a “prettyxml ” format.
print(xml.dom.minidom.parseString(str(result)).toprettyxml())
- Execute from the terminal.
$ python get-int-details.py
The device will return interface information about the device formatted in XML.
<?xml version="1.0" ?>
<rpc-reply message-id="urn:uuid:838dcd7c-94e9-422e-b9b3-f30990b3ea2d" xmlns="urn:ietf:params:xml:ns:netconf:base:1.0" xmlns:nc="urn:ietf:params:xml:ns:netconf:base:1.0">
<data>
	<native xmlns="http://cisco.com/ns/yang/Cisco-IOS-XE-native">
		<interface>
			<GigabitEthernet>
							<name xmlns:nc="urn:ietf:params:xml:ns:netconf:base:1.0">2</name
				<description>RSTForum NETCONF Script</description>
				<ip>
					<address>
						<primary>
							<address>10.255.255.1</address>
							<mask>255.255.255.0</mask>
						</primary>
					</address>
				</ip>
				<negotiation xmlns="http://cisco.com/ns/yang/Cisco-IOS-XE-ethernet
					<auto>true</auto>
				</negotiation>
			</GigabitEthernet>
		</interface>
	</native>
</data>
</rpc-reply>
Adding Something to the Configuration
-
Open the file “create-loop.py” in a text editor. Let’s walk through the new parts to observe.
-
In order to add something via NETCONF, we need to build an XML payload that has the desired configuration modeled based on an available YANG model. Here a template for an XML payload to add an interface based on the “ietf-interfaces” model is created.
<config>
		<interfaces xmlns="urn:ietf:params:xml:ns:yang:ietf-interfaces">
						<interface>
										<name>{int_name}</name>
										<description>{int_desc}</description>
										<type xmlns:ianaift="urn:ietf:params:xml:ns:yang:iana-if-type">ianaift:softwareLoopback</type>
										<enabled>true</enabled>
										<ipv4 xmlns="urn:ietf:params:xml:ns:yang:ietf-ip">
														<address>
																		<ip>{ip_address}</ip>
																		<netmask>{subnet_mask}</netmask>
														</address>
										</ipv4>
						</interface>
		</interfaces>
</config>
"""
# Build the XML Configuration to Send
RSTForum_netconf_payload = RSTForum_template.format(int_name="Loopback1",
																				int_desc="RSTForum NETCONF created Loopback",
																				ip_address="2.2.2.2",
																				subnet_mask="255.255.255.0"
																				)
</config>"""
- Lastly, here the edit-config operation is executed.
# Send NETCONF <edit-config>
RSTForum_netconf_reply = m.edit_config(RSTForum_netconf_payload, target="running")
- Close the script and run it from the terminal. Provide the inputs for the new interface when asked.
$ python create-loop.py
Deleting Loopback that was just created
If you want to remove it from the configuration?
-
Open the file “delete-loop.py” in a text editor and observe.
-
Look at the operation = “delete” on the interface leaf. This is how we can specify the specific activity to take on an object.
RSTForum_netconf_template = """
<config>
				<interfaces xmlns="urn:ietf:params:xml:ns:yang:ietf-interfaces">
								<interface operation="delete">
												<name>Loopback1</name>
								</interface>
				</interfaces>
</config>
"""
- Close the script and execute it from the terminal.
python delete-loop.py
Note: if you try to delete an interface that doesn’t exist, you will get a NETCONF error. Give it a try!