Microsoft Lab 1 – Windows Server 2016 Installation
Windows Server 2016 Installation
In Lab 1 - Windows Server 2016 Installation, participants typically embark on the foundational step of deploying the Windows Server 2016 operating system. This lab involves tasks such as setting up the installation media, booting the server from the installation source, and configuring key parameters during the installation process. Participants may choose installation options based on the specific server roles and features they intend to utilize. The lab aims to provide hands-on experience in the initial deployment and configuration of Windows Server 2016, emphasizing the importance of a proper installation for establishing a stable and secure server environment. Successful completion of Microsoft Lab 1 equips participants with fundamental skills required to install Windows Server 2016, setting the stage for subsequent configuration and administration tasks in a Microsoft server environment.
Lab:
1. Open VMware and click on the Create a New Virtual Machine(Ctrl+N) icon.

2. Now select the Custom (Advanced) option to specify the virtual machine with advance options. If you want you can create virtual with fewer options, click on the Typical option. When you are finished here, click on the Next button.

3. Leave the Virtual Machine Hardware Compatibility settings as default. If you want you can select your VMware version. Then click Next button.

4. Here you should add an installer image into the virtual machine. Select the Installer disc image file (ISO) option and click on the Browse button. Specify the .iso file path and import it. Then click on Next button.

5. Specify which operating system type you want to install on the virtual machine. Select Windows Server 2016 version from the dropdown menu and click on Next button.

6. Enter a name for the virtual machine and browse a place where you want to store the installation files. For the purpose click on Browse button and specify the place. When finished, click on Next button.

7. On the Firmware type specify what kind of boot device should this virtual machine has. Leave the Firmware type on by default and click on Next button.

8. On the Processor Configuration specify the number of processors your server need to use and click on Next button.

9. Specify the amount of the memory for the virtual machine (based on MB) and click on Next button.

10. Select Use Network Address Translation(NAT) or Use bridged networking to directly connect and use the internet, as a network type. Then hit Next.

11. Let the I/O Controller types by default because we don’t have the option to change the SCSI type, just hit Next.

12. Leave the Disk type by default on SCSI as it is also recommended, just hit Next.

13. Now to create new virtual disk, select create a new virtual disk for the virtual machine.

14. Specify the disk amount by typing the disk size(Recommended 60 GB) and click on Next button.

15. Specify where would you like to store the disk file, leave it by default and click on Next.

16. At this point, just check out the settings you’ve done or you can customize if you want and click Next.

17. Now it’s time to boot up and start the virtual machine, just click on Power on this virtual machine then wait until it boots.

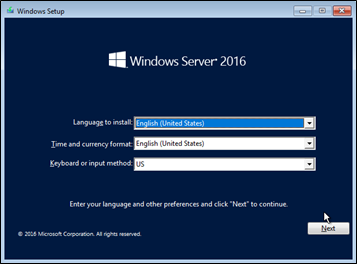
18. When the virtual machine powered on, specify the language, time zone and keyboard then click Next.

19. Install now to install the windows server 2016 on virtual machine.

20. Select one the Windows Server editions you’ve decided and click on Next button.

21. Put a mark in the box next to I accept the license terms, then click on the Next button.

22. Go on and click on the Custom: Install Windows only (Advanced) option for installing the server custom.

23. Select the disk, you want to install the windows on and select the disk, click on New, then specify the amount (based on MB) and click on Apply button then click on Next button.

24. Now the server copies all the files to the disk, amount the files from the windows image, install features, updates, so it will take time and when finished it will reboot.

25. After the reboot, type a complex password composed of (uppercase, lowercase, symbols and numbers) and click on Finish button.

26. When the customization finished, now you’ll need to sign in, but first click on the button that is composed of three buttons (ctrl+alt+del) shown in the image below or simply press Ctrl+Alt+Del and sign in to Windows Server.
